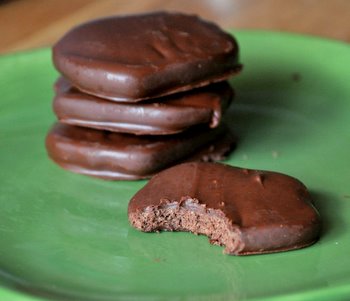
Over the past couple of years, I have put together a collection of a number of homemade recipes for Girl Scout Cookies. My recipes are made with all natural ingredients and, rather than having to wait for cookie season to come around, you can make them yourselves any day of the year. The Girl Scouts don’t currently make any of their cookies gluten free, and while some scouts are petitioning to try to get the organization to introduce a gluten free option, I decided that I would put together a recipe for some gluten free Girl Scout cookies that you can make at home. I started with Gluten Free Thin Mints, because the thin chocolate wafer cookies are the most popular flavor of Girl Scout Cookie.
Classic Thin Mints are light and crisp, covered with a thin layer of dark or semisweet chocolate. This gluten free variation has a very similar texture. The cookies are light and crisp, with a subtle cocoa flavor to them. They take on a whole new dimension once they’re dipped in a layer of dark chocolate that has both mint and vanilla added to it, becoming more flavorful and much more like the “real” thing. The cookies are good – gluten free or not – and they are a fantastic option for Girl Scouts and fans of Girl Scout cookies who can’t eat wheat.
I used a commercially available gluten free flour blend for this recipe because there are so many gluten free flour choices out there and it is much easier for most people to start with an already made blend, rather than combining a half dozen flours themselves. I tried out a couple of flours and the flour that I got the best results with a flour blend that included a good proportion of garbanzo bean flour (ground beans, essentially) and some fava bean flour. I used Bob’s Red Mill Gluten Free All Purpose Baking Flour and would definitely recommend it for these cookies. The recipe will work with other types of gluten free flour blends (as long as you choose an “all purpose” or “multi purpose” blend), but I found that the texture was not nearly as good when I used rice flour based mixes. The rice flour blends produced a cookie that was crisp, but had a gritty, unpleasant texture. The only drawback to the bean-based flour blend is that the raw cookie dough tastes pretty awful, due to some bitterness from the beans. Not to worry, however. Any off tastes bakes out completely in the oven and you’re left with a tasty wafer cookie that is chocolatey, slightly minty and just waiting to be dipped in chocolate! I’ve also had good results with C4C Gluten Free Flour.
The chocolate glaze is made with dark or bittersweet chocolate and butter, which gives it a thinner consistency that allows for easier dipping of the cookies. I stirred in a little bit of vanilla and peppermint extract (peppermint oil is fine, too) to the melted chocolate to enhance the subtle flavors in the cookies themselves. The cookies are best when they are freshly baked or stored on the kitchen counter, as they tend to soften up a little bit when stored in an airtight container, as many other cookies do. If you’re not going to eat them right away, pop them in the freezer and you’ll have a crispy Thin Mint at hand whenever you’re in the mood.
There are a few steps to making these cookies, but they’re really not that difficult and the result is well worth the wait. Minty, chocolatey, crunchy and totally gluten free – what more could you want, besides a Girl Scout to make them for you so you don’t have to do it all yourself!

Homemade Girl Scout Cookies: Gluten Free Thin Mints
6 tbsp butter, room temperature
3/4 cup sugar
1 large egg
1/2 tsp vanilla extract
1/2 tsp peppermint extract or oil
4 1/2 tbsp unsweetened cocoa powder
1 3/4 cup + 2 tbsp gluten free all purpose flour (pref. Bob’s Red Mill Gluten Free All Purpose Baking Flour)
1/4 tsp salt
In a medium bowl, cream together butter and sugar until light and fluffy. Beat in egg, vanilla and peppermint extracts, followed by the cocoa powder. Blend thoroughly. Add in gluten free flour and salt and mix until mixture comes together in a soft dough and no streaks of flour remain visible.
On a large piece of parchment or wax paper, shape dough a log about 1 1/2 inches (or about 4 cm) in diameter. Roll up tightly and freeze for at least 1-2 hours.
Preheat oven to 375F. Line a baking sheet with parchment paper.
Remove dough from freezer. Dough may be very firm, and if so, allow it to sit for a few minutes before slicing.
Slice dough into rounds not more than 1/4 inch thick – if they are too thick, they will not be as crisp – and place on a parchment lined baking sheet. Cookies will not spread very much, so you can put them quite close together.
Bake for about 12-13 minutes, until cookies are firm at the edges. Allow to cool on baking sheet for 2-3 minutes, then transfer to a wire rack. Cookies will firm up more as they cool.
Cool cookies completely before dipping in chocolate.
Dark Chocolate Coating
10-oz dark or semisweet chocolate
1/2 cup butter, room temperature
1/2 tsp vanilla extract
1/2 tsp peppermint extract or oil
In a microwave safe bowl, combine chocolate and butter. Melt on high power in the microwave, stirring every 45-60 seconds, until chocolate is very smooth. Stir in extracts. Chocolate should have a consistency similar to thick chocolate syrup.
Dip each cookie in melted chocolate, turn with a fork to coat, then transfer to a piece of parchment paper or wax paper to set up for at least 60 minutes, or until chocolate is cool and firm.
Reheat chocolate as needed to keep it smooth and easy to dip into.
Cookies can be stored at room temperature (unwrapped) if they will be eaten within a couple of days, otherwise they should be kept in the freezer for long term storage.
Makes about 3 dozen.
*Note: Other gluten free flour blends will work, but I had the best results with Bob’s Red Mill Gluten Free All Purpose Baking Flour. I’ve seen this at most supermarkets in my area and at stores like Target. You can also buy it online. The raw dough (which I don’t recommend eating in general) doesn’t taste great, but don’t be put off by that. This flour makes great gluten free cookies.